Ham Or Hem

Exploring the world of home cook dishes and hand made crafts

Spring is in the air 22 September, 2014

Don’t we all love spring beside the start of my hay fever season too? A couple of weeks ago I’ve pruned my plants and herbs, refreshed the soil and getting them ready for another year of great harvest. My chilli plants are only 1 year old but I still trim off the top crown to help boost the growth.

Here’s a picture of my chilli plants before pruning :

IMG_4489.JPG

Here are chilli plants after pruning:

IMG_4490.JPG

I’ve also added a few new additions to the garden. Such as broccoli , asparagus, sage, strawberry,basil and spring onion. Hopefully they will all survive because we do have very harsh summer here in Australia,

Broccoli, top picture week 1, bottom picture week 2. It’s amazing how quick they have grown:

IMG_4488.JPG

I never knew this is how asparagus look like till I picked some up at the local nursery:

IMG_4485.JPG

Been wanting to find sage for a long time and finally found some. I wonder if they die off like basil during winter. I will need to research on that a little bit more :

IMG_4441.JPG

It has been years since I planted strawberry. My husband insisted that we should plant it again. Will need to buy some netting to prevent the birds from eating my strawberries:

IMG_4481.JPG

Replanted a new batch of sweet basil. I love basil but it’s also one of the herbs which attracts lots of bugs 😦 I have lots of sticky bugs catcher things placed around my pots which helps prevent the bugs from attacking my herbs but they still get attacked by bugs:

IMG_4426.JPG

Little batch of spring onion:

IMG_4429.JPG

Oh if any of you have snails and slugs problem with your veggie or herb garden, I recommend saving aside the egg shells whenever you are using eggs for your cooking. I crush them into very small pieces, add some water to the mix and pour them around the soil of the parameter of the plants or the pots. Stop snails and slugs, at the same time acts as fertiliser 🙂 while you recycle the waste properly. It is a win win situation.


Bite size gyoza (Japanese dumplings) 18 August, 2014

Over the weekend I’ve decided to make some gyoza (japanese dumplings) again but this time with homemade dumpling wrappers. I did make them before and was successful so I thought why not try it again. I have added the recipe for the dumpling wrappers to the recipe page in case anyone is interested. Making the dumpling wrappers from scratch is actually easy but of course I do not recommend it if you don’t have time because it does take time to roll and cut them. So … I’ve not explained why they are bite size gyoza. Well…I had all intention to make a regular size gyoza but when I went through my kitchen drawers, I can only find a round cookie cutter with curly edges. The good thing is, the curly edges don’t make any difference when the gyoza is done. Its probably not a bad idea to have bite size gyoza 🙂 pretty cool party snacks other than the fact that it takes forever to cut the wrappers and wrap all the dumplings 🙂


dumpling_wrappers

Homemade dumpling wrappers

Bite size gyoza

Bite size gyoza


Palm size garden growing very well 1 June, 2014

Filed under: Garden — Ham Or Hem @ 9:19 pm
Tags: , , ,

A few weeks ago I started my palm size garden experiment. I’ve constructed 4 of them and kept 1. I was wondering if they will survive when I first started even though I know succulents are very hardy plants. Moving them from ground to a small contained area is obviously not their preferred environment. Keeping them indoor away from the sun was probably depriving them from their normal environment. My little palm size garden has definitely done way better than I envisage. The succulents are growing so well that I hope the arrangement looks cuter like when it first started. I guess I can’t complaint when the experiment is a success.

Palm size garden

Palm size garden


Old design with a few personalised touches 26 May, 2014

Filed under: Crafts,Dolls — Ham Or Hem @ 10:06 pm
Tags: , , , , ,

Not too long ago a friend of mine asked me if I can replicate a doll I made previously because she loves the look of it. I am very happy that she liked my previous creation but at the same time I prefer people who buy my handmade dolls get a bit of customisation so that they are unique to each of the owners. So, with my fabulous persuasion skill, I managed to convince my friend that I should be creating a “mini” version if her instead. Of course that did not take much to get her convinced. Some of you who might have navigate through the craft page on this blog might have seen the “Chanel” style doll. This is version has a slightly different shaped short cape and different style shoes. It was so cool to see a huge smile on the face of a very satisfied customer. I’m sure this little one will be very well taken care of by her new owner.

Chanel style doll

Chanel style doll

Chanel style doll

Chanel style doll

Chanel style doll

Chanel style doll

Chanel style doll - shoes close up

Chanel style doll – shoes close up

Chanel style doll - shoes close up

Chanel style doll – shoes close up


Palm size indoor garden update 21 May, 2014

Filed under: Garden — Ham Or Hem @ 8:35 pm
Tags: , , , , ,

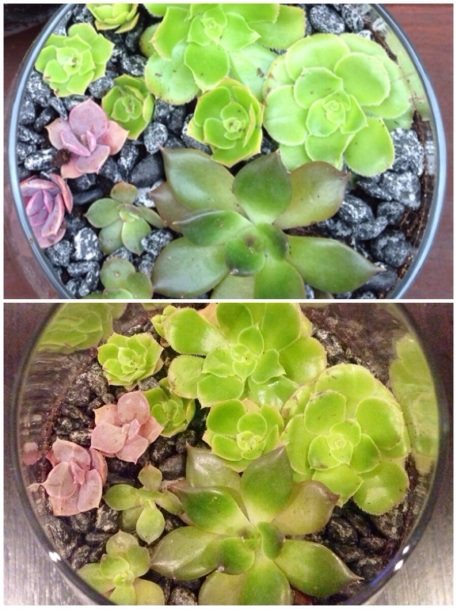
Over a week ago I had a go at making miniature succulent arrangements in drinking glasses. I wasn’t sure if it will work when I set them. A week later, they are still alive and growing!

Before and after shots

Top: When it was first planted, Bottom: Over a week after

I’m so happy with the result. It’s an amazing eco-friendly gift for friends. It is such a beautiful and contemporary display which is perfect for small living spaces. I made a few more over the weekend and intend to make  more for my close friends. So if you have succulents in your garden, why not start making these gorgeous little displays. I’m sure you and your friends will enjoy having one of these displaying at home.

New arrangement 1

New arrangement 1

New arrangement 2

New arrangement 2


An indoor underwater garden 19 May, 2014

Don’t we all love a good garden? The only problem is, there’s not much to see when I get home from work. We’ve always have aquariums with random live plants planted in the tanks because i don’t like the look of plastic plants and plastic is really not ideal for the fish. Even though we had plants in the tanks, they never look good or healthy until I decided to research on aquascaping last year. Yes you heard it right, aquascaping instead of landscaping. instead of planting on land, I’ve moved the garden under water. It was nothing like buying a few bags of potting mix, a few  pots of nice plants from the nursery and plant away. After researching for a long period of time, deciding on the right set up, my husband and I made up our mind to upgrade our new aquarium in August last year. There are some videos which I’ve posted on youtube via our other blog http://www.fishspectator.com which you can see the transformation of the tank from when we started till now (8 months later). I was truly impressed with the growth and health of the plants when we got it all set up and running. Aquascape is just like any garden, choosing the right plants, the right substrate, pruning, replanting, fertilising, ensuring that there is enough light (with the use of the right coloured light tubes) and the right amount of CO2 is diffused into the water to ensure healthy plant growth. Please do not try this at home if you have not done your research properly or you will find that you are burning a huge hole in your pocket just to replace the dead plants. I have gone through a lot of heartache with replacing or replenishing the plants because my tank is highly populated with very active fish which also like to munch on some of my plants. I’ve spent hours and hours standing on a step ladder, bending over the tank with a pair of tweezers organising the plants in the right position. It took a few trials to ensure that our fish do not like the taste of some of the plants before I buy more. Traditionally a true aquascape only has tiny fish such as neon tetras to help with the cycle of the water and prevent any destruction of the plants but I’ve definitely gone against the rule to get the best of both worlds (a planted tank and beautiful fish to view. My “scape” I’ve created  is no where close to the experts or the ADA experts in Japan but its definitely a nice indoor “garden” which my husband and I enjoy view after a long day at work. I still have to do some “gardening” every weekend before water change but the maintenance is getting easier now


Aquascape - Start

When I first started in Aug 2013

Aquascape - a few months later

A few months later

Aquascape - May 2014

How it looks like now in May 2014


No space for a garden? How about having it in a drinking glass 12 May, 2014

Filed under: Garden,Home decor — Ham Or Hem @ 8:22 am
Tags: , , ,

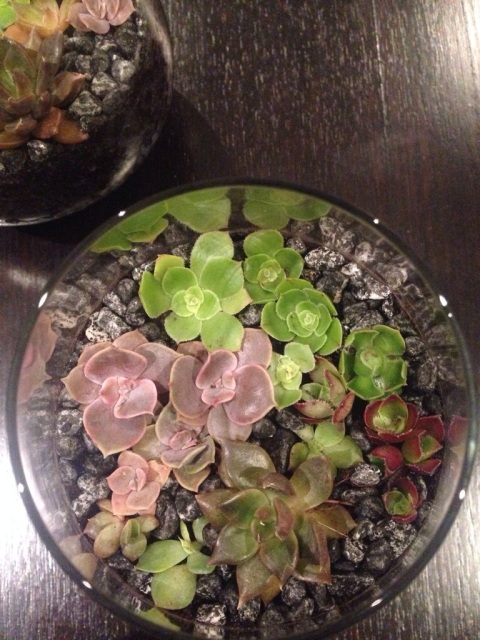
Been to the florists lately? If you have, you may notice the little glass display with assorted succulents. Considering lots of people are time poor and have limited living space, this is an awesome idea. But this is also when I say to myself “why did I not think of that”. But better late than never, I bought 2 drinking glasses from Daiso (similar to $2 shop) and start scoring for baby succulents from my garden. A pair of long tweezers (I used the one I use for aquascaping but I’m sure any tweezers are fine), a bit of potting mix, some baby succulents I found around the garden, some gravels and off I went to plant them. I’m pretty happy with the end result but let’s hope the roots will establish in the next few days and they will survive well. If this is a success it will be a cool gift for friends and family.

Mini garden

Mini garden in drinking glasses

Baby succulent garden

Mini succulent garden in a glass


Purple magic 19 February, 2014

Filed under: Crafts,Dolls,Felt craft,Plush toys — Ham Or Hem @ 9:06 pm
Tags: , , , , ,

A couple of weeks ago, a colleague of mine ordered a doll from me. I love new challenges. The requirement was, create a mini version of the owner incorporating her favourite purple color, her favourite gym pants, a cake and a dumbbell. I struggled with the gym pants for a while and almost gave up but thank god I manage to create it after 3 tries. The sense of achievement after completing the doll was amazing! Sewing the hair is always the most frustrating and time consuming but when I am able to hold a pair of scissors and start trimming the hair it’s when I am the happiest…. That’s when the doll is almost done and I can finally see how it looks like with all the component put together. All up it took me 1.5 weeks spending 2 to 3 hours each weeknight and a bit more on weekend to get this doll done. The result was rewarding because I’ve got a very happy customer when I delivered the doll this morning.

20140219-210210.jpg

20140219-210227.jpg

20140219-210313.jpg

20140219-210322.jpg

20140219-210334.jpg

20140219-210348.jpg

20140219-210358.jpg


Ring pillow made with love 8 February, 2014

Filed under: Crafts — Ham Or Hem @ 5:01 pm
Tags: , , ,

A couple of weeks ago a good friend of mine came to me and ask if I would be able to make her a ring pillow. I felt absolutely honoured, excited and yet a bit worried that what I make won’t be good enough for her. It is after all her wedding and it is hard to tell your friend the product is rubbish if you don’t like it. There is no other specifications from the gorgeous bride other than she needs a ring pillow. After a few sketches, I kind of work out what I envisage it to look like and off to get some materials and at the same time asked the bride to find some antique brooch or jewellery which her grandparents left for her and her mum. I prefer clean and elegant look without too much clutter. Because both the bride and mother of the bride are very close to the grandparents I was very happy that I was able to include it in the design. So here it is

Front of the ring pillow

20140208-165454.jpg

Back of the ring pillow (the little button is to hold the ribbon and lace in place because I don’t want to use too much glue.

20140208-165648.jpg

Showed the bride and groom the photos and they love it so far, hopefully they like what they see I deliver the ring pillow to them next week.


My first attempt making Lor Mai Kai (Glutinous Chicken Rice) 30 January, 2014

Happy New Year everyone and Happy Chinese New year to the ones celebrating it around the world.

Can’t believe it has been 2 months since I updated the blog, Its been quite a busy couple of months both at work and home. I’ve  not really been cooking much new stuff in my humble kitchen until now. Glutinous Chicken rice wrapped in lotus leaf  (also known as Lor Mai Kai) is one of my favourite yum cha dishes. Its not easy to find a good one too because some of them are too dry or too little ingredients. Over the weekend I thought I will give it a shot and try to create it. After a few minutes of online research I started the 2 days prepping process. 2 days sound pretty hideous but  it is really not that bad. 

It started with soaking the glutinous rice overnight. Why do they always say overnight instead of hours?! So my analyst brain starts to get to work, we need at least 8 hours sleep (not all but some people) so I have to soak it for at least 8hrs and because usually cooking happens in the afternoon or at night so I added a few more hours and made the decision to soak it for 12hrs. At this point I was worried. Thinking, is that enough time or too long . I can tell you now it is just the right amount of time 🙂

lo mai kai_ingredients


In the morning, I marinated chicken thigh pieces (light soya sauce, sugar, sasame oil, white ground pepper, oyster sauce and a bit of dark soya sauce for color), soaked some dried shitake mushrooms, dried baby scallops (can be replaced with dried shrimps), soaked and clean the lotus leave.

From what I’ve read from the internet, you will need to at least steam the glutinous rice for 1hr/ till cooked. First thing that came to my mind is, what?! really for 1hr?! I have to watch the steamer to make sure that it doesn’t dry up and opening and closing the lid to top up the water will impact my cooking time. And “ding ding” I have a light bulb moment… I will risk it and cook the soaked glutinous rice with rice cooker instead. Off I went and dumped everything in the rice cooker, add water, a bit of sugar, light soya sauce and a bit of salt. Stir the  seasoning through the mix and turned on the rice cooker. No need to watch the fire or water, let the technology do all the hard work. I can tell you now, it worked like magic! The rice was nicely cooked and ready to be put together.

The next few steps were quite easy. sauteed some chopped garlic, add the dried scallops or dried shrimps (whichever you choose to use), then add the shitake mushrooms, stir fry for a few minutes till you can smell the nice fragrant. stir through a bit of corn flour into the marinated chicken then add it to the mushrooms and scallops/dried shrimps mix. Once its done its not far from the finishing line. Wrapping it is quite easy, some like a bigger pack then the others but I personally think glutinous rice more filling than normal grains so I like a smaller portion. Lay the cleaned lotus leave on a chopping board or cleaned benchtop (I’ve used the glossy side up because I think  that will probably not stick that easily, follow by chicken and mushroom mix, topped up with the cooked glutinous rice (I did a 1:2 ratio for the ingredients and rice). Fold in the sides and its all ready for the last steaming process.


lo mai kai_wrapped


Once its all wrapped its another 30mins and they are all ready. If you are lazy to wrap them in lotus leaf, you can place them in small bowls or the small aluminium bowls. But of course lotus leaf adds a nice fragrant to the rice.

lo mai kai


It is a successful experiment and again I will post the recipe when I get a chance to type them all up. In the mean time, for some of the experienced cooks, I hope this post will give you an idea of what you need to make the dish.

Oh and not forgetting its Chinese New Year (Year of horse)  tomorrow 31/01/2014. Wishing all the people around the world who are celebrating it, a Happy Chinese New Year and a prosperous year ahead. Gong Hei Fat Choi!